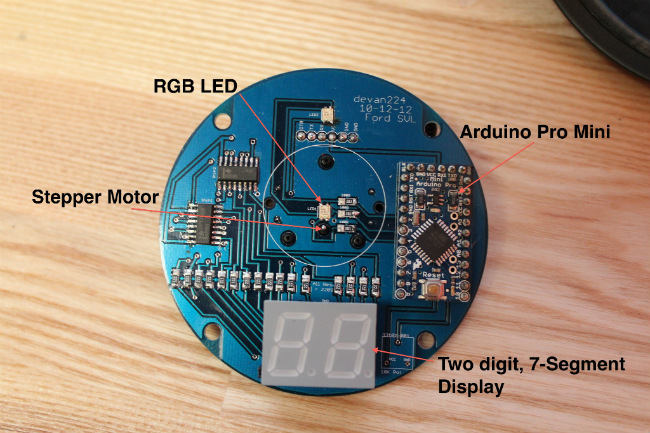
The Retro Gauge consists of 4 main components - an Arduino, a two digit 7-segment LED display, a stepper motor, and two RGB LEDs. This section will walk you through each component and how it works with the retro gauge.
Arduino
Arduino is an open-source electronics prototyping platform based on flexible, easy-to-use hardware and software. It is intended for artists, designers, hobbyists, and anyone interested in creating interactive objects or environments.
Arduino can be used to develop interactive objects, taking inputs from a variety of switches or sensors, and controlling a variety of lights, motors, and other physical outputs. Arduino projects can be stand-alone, or they can communicate with software running on your computer (e.g. Flash, Processing, MaxMSP.) The boards can be assembled by hand or purchased preassembled; the open-source IDE can be downloaded for free.
What is the difference between an Arduino Uno and an Arduino Pro Mini?
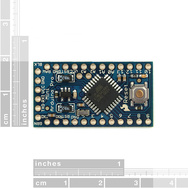
Arduino Pro Mini, image licensed under the Creative Commons Attribution-Share Alike 3.0 Unported license from SparkFun
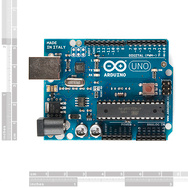
Arduino Uno, image licensed under the Creative Commons Attribution-Share Alike 3.0 Unported license from SparkFun
The most obvious difference between the two boards is the size. An Arduino Pro Mini is 1.3" x 0.7", while the Uno is 2.7" x 2.1". The smaller size allows the Mini to work better with projects that have small size constraints. The major hardware difference between the Uno and the Mini is that the Mini is missing the Atmega8U2-based USB-to-Serial converter. This means that the Arduino Pro Mini requires an off board FTDI USB serial IC to flash the code to the processor.
There are a wealth of libraries and projects that use the Arduino platform. The Retro Gauge uses the Arduino Pro Mini because of its size and accessibility. Rather than designing the board with a microcontroller that requires a specific bootloader and IDE, the Retro Gauge was designed around the Arduino Pro Mini because of its popularity in the hobbyist community.
Two Digit 7-Segment Displays
A two digit 7-segment display is a common digital display used in gauges and aftermarket products. It allows a user to easily know the value of their output at a single glance.
One of the challenges of using the Arduino Pro Mini is the number of addressable digital outputs available. An Arduino Pro Mini only has 14 digital outputs available, and the two digit 7-segment displays and other components of the gauge require more than 14 outputs. By using a 74HC595 shift register, you can add 8 digital outputs to your projects. In the case of the Retro Gauge, two 74HC595 shift registers are use to add an additional 16 outputs to the Arduino Pro Mini to control the two digit 7-segment display. For more details on the 74HC595, check out the Bildr tutorial.
Resources
Stepper Motor
There are two basic types of stepper motors, bipolar motors and unipolar motors. Bipolar motors generally have two pairs of coils and to move them, you simply apply a phase-shifted pulse to the two coils. A unipolar motor generally has 6 leads, 2 pairs of three wires powering one coil with a center tap.
The Retro Gauge uses a bipolar motor and is controlled by the Arduino using an open source library from the Gaugette project, by Guy Carpenter. Guy originally set out to make an analog gauge that could show system health indication or maybe network bandwidth or web traffic. The project has been forked several times to make different gauges that display different kinds of data, and now vehicle data.
Resources
HSV

This image is licensed under the Creative Commons Attribution-Share Alike 3.0 Unported license from Wikipedia
The RGB LEDs are used for both aesthetics and status indication. When dealing with RGB LEDs it is also nice to be able to adjust the color of the LED without having to use 3 different pins and potentiometers to determine the pulse-width module (PWM) value for each color (Red, Green, Blue). For this reason, the Retro Gauge uses Hue, Saturation, and Lightness (HSL) - to digitally control the RGB LEDs over 3 analog pins.
HSL is used to pick a particular color with only one input. By setting the saturation and lightness value constant, a user (or sensor) can determine the Hue value to set the color of the LED.